In-Place Upgrade
A Windows in-place upgrade is a process that updates the Windows operating system to a newer version while retaining existing applications, settings, and personal files. Instead of performing a clean installation, the in-place upgrade preserves the user’s data and installed software, minimizing disruption. The in-place upgrade could be the final alternative before you have to reinstall the operating system.
Benefits of In-Place Upgrade
Performing an in-place upgrade offers several advantages, making it a preferred choice for many users. Here are the key reasons to utilize this upgrade method:
- Upgrade to a Newer Windows Version: Seamlessly transition your current Windows installation to the latest version without losing your personal data or applications.
- Repair Existing Installation: Fix any issues or corruptions in your current Windows setup without the need for a fresh installation, saving time and effort.
- Apply Major Updates: Integrate significant updates that enhance system performance, security, and introduce new features, ensuring your operating system stays up-to-date.
- Maintain Continuity: Preserve your settings, applications, and configurations, minimizing the need for extensive reconfiguration and ensuring a smooth user experience.
Why Choose In-Place Upgrade?
Using the in-place upgrade method provides a convenient and efficient way to enhance or repair the Windows operating system while maintaining your existing environment. This ensures a seamless transition, allowing you to continue your work with minimal disruption. Key Advantages:
- Time-Efficient: Avoid the lengthy process of backing up data, performing a clean installation, and restoring settings.
- Cost-Effective: Reduce the need for additional resources or professional assistance for system repairs.
- User-Friendly: Designed to be straightforward, making it accessible even for users with limited technical expertise.
By opting for an in-place upgrade, you ensure that your system remains robust, secure, and up-to-date, all while keeping your workflow uninterrupted and your personal environment intact.
Before you begin
Before initiating a Windows in-place upgrade, it is crucial to prepare your system to ensure a smooth and successful transition.
- Back-up all important personal files, documents, and data to an external storage device or a cloud service to prevent any potential loss during the upgrade process. Ideally, create a complete backup of your Windows installation (eg. bit-level copy) to ensure you can easily restore it if needed.
- Verify that your computer meets the minimum system requirements for the new Windows version, including sufficient disk space, memory, and processor specifications.
- Check the compatibility of your existing applications and drivers to ensure they will function correctly after the upgrade.
- Make sure your current Windows installation is up-to-date with the latest updates and patches.
- Disconnect any unnecessary peripheral devices such as external drives, printers, or USB devices to avoid complications.
- Additionally, disable or temporarily uninstall any antivirus or security software, as these can sometimes interfere with the installation process.
Be aware that some of your customized Windows settings may be lost through this process.
Get started
To begin the Windows in-place upgrade process, follow these steps:
1. Prepare Compatible Installation Media
Ensure that the installation media matches your system’s language and edition, allowing you to select the option to retain your system and application data.
- The installation process verifies the system’s product, version, and edition by comparing them with the information stored in the system registry at
HKEY_LOCAL_MACHINE\SOFTWARE\Microsoft\Windows NT\CurrentVersionto ensure compatibility. - You can verify your system localization by running the command
DISM.exe /Online /Get-Intl.
2. Perform Data or System Backup
Back up all important files, documents, and system settings to an external storage device or a cloud service. This ensures that your data is safe in case any issues arise during the upgrade process.
3. Start the In-Place Upgrade
Insert the installation media into your computer and navigate to the media in File Explorer. Run setup.exe from the installation media while your current Windows system is running. Follow the on-screen instructions, and when prompted, choose the option to keep your files and applications to preserve your existing data and installed software.
Installation steps
Performing an in-place upgrade of Windows allows you to upgrade your current Windows installation to a different version while keeping your personal files, settings, and applications intact. Below are the comprehensive steps involved in the in-place upgrade process:
1. Execute setup.exe
- Insert Installation Media: Insert the Windows installation media (such as a USB drive or DVD) into your computer. Alternatively, if you have an ISO file, mount it.
- Run the Installer: Navigate to the installation media and double-click on
setup.exeto initiate the upgrade process.
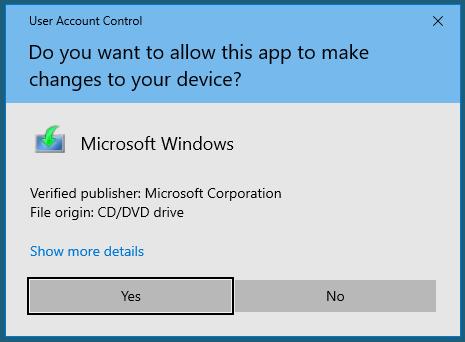
2. Accept User Account Control (UAC)
- UAC Prompt: A User Account Control dialog will appear, asking for permission to allow the installer to make changes to your device.
- Grant Permission: Click Yes to proceed.
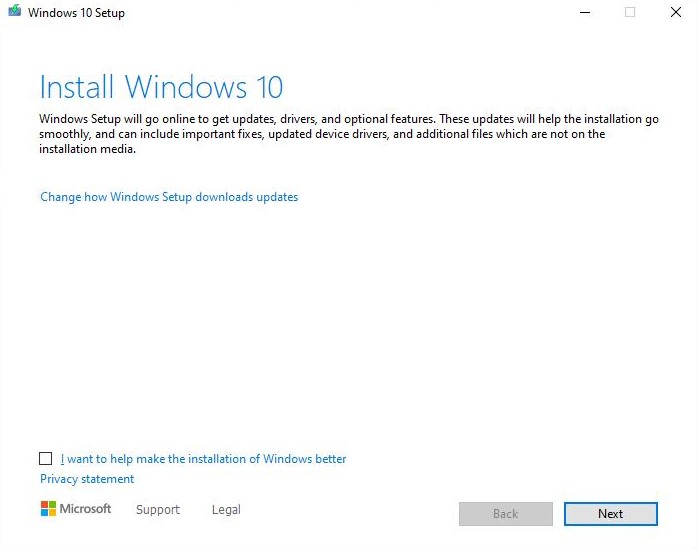
3. Connect to the Internet for Updates
- Notification Screen: A screen will inform you that Windows needs to connect to the internet to download updates and gather necessary files.
- Proceed: Click Next to continue. Ensure your computer is connected to the internet to avoid interruptions.
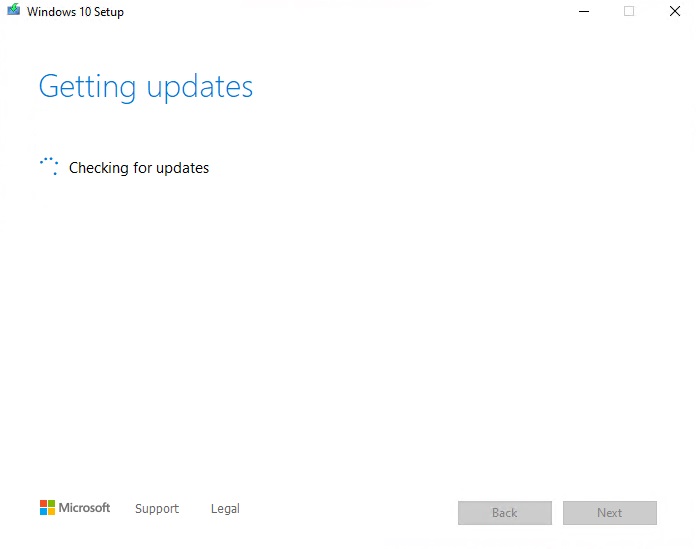
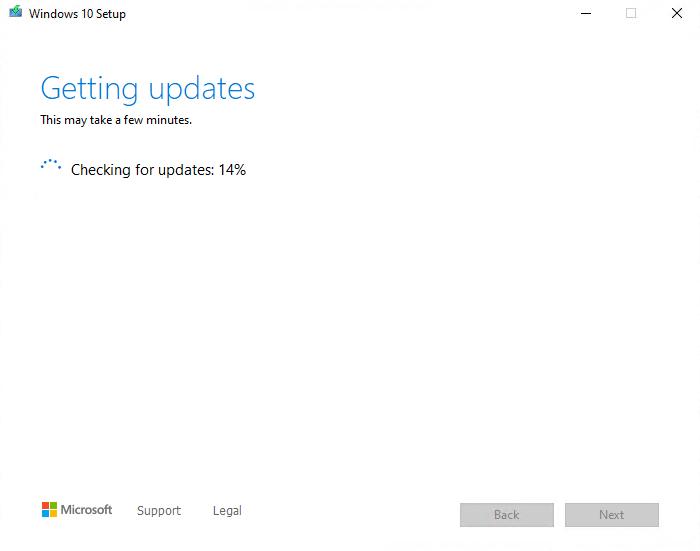
4. Check for Updates
- Progress Screen: The installer will display a progress bar while it checks for available updates.
- Wait: Allow the process to complete, which may take several minutes depending on your internet speed and the number of updates.
5. Accept License Terms
- License Agreement: Review the Microsoft Software License Terms presented on the screen.
- Agreement: Select I accept the license terms and click Next to continue.

6. Downloading and Installing Updates
- Update Installation: The installer will download any additional updates required for the new version of Windows.
- Progress Indicators: Progress bars and status messages will inform you about the ongoing processes.
7. Choose What to Keep
Customization Options: You’ll be prompted to choose what you want to retain during the upgrade.
- Keep personal files and apps: Retains your personal data, settings, and installed applications.
- Keep personal files only: Retains only your personal data, excluding installed applications.
- Nothing: Performs a clean installation, removing all personal data and applications.
Select Option: Choose the option that best fits your needs and click Next.

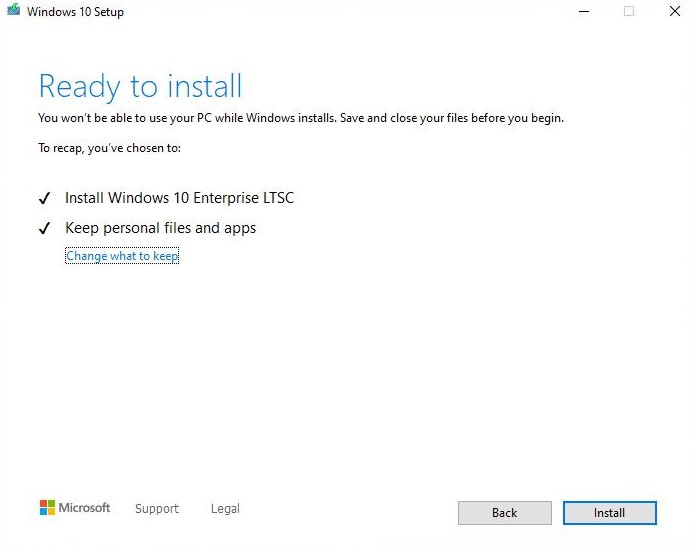
8. Prepare for Installation
- Summary Screen: A summary of your choices and what will happen during the upgrade will be displayed.
- Ready to Install: Click Install to begin the upgrade process.
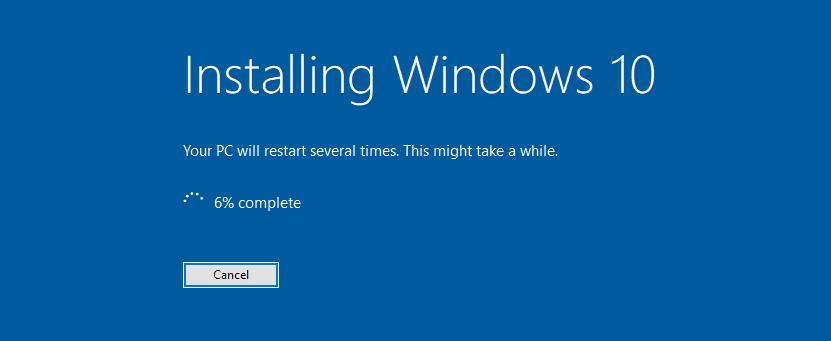
9. Installation Phase
- File Copying: Windows will copy necessary files to your system.
- Feature Installation: New features and components will be installed.
- System Configuration: System settings will be updated to accommodate the new Windows version.
- Multiple Restarts: Your computer may restart several times during this phase. Ensure your computer remains plugged in and avoid interrupting the process.
10. Finalizing Installation
- Setup Configuration: After the main installation, Windows will finalize settings, configure drivers, and apply preferences.
- Sign-In: You may be prompted to sign in with your Microsoft account and adjust privacy settings.
11. Completion
- Welcome Screen: Once the installation is complete, you may be greeted with the Windows welcome screen.
- Verify Installation: Check that your personal files, settings, and applications are intact (if you chose to keep them).
12. Post-Upgrade Tasks
- Windows Update: Run Windows Update to ensure all the latest patches and updates are applied.
- Driver Updates: Verify that all hardware drivers are functioning correctly. Update them if necessary.
- Application Checks: Open your installed applications to ensure they are working as expected.
- Backup: It’s a good practice to back up your system after a successful upgrade.
13. Troubleshooting (If Needed)
- Issues Encountered: If you encounter any problems during or after the upgrade, use the Windows Recovery Environment (WinRE) to troubleshoot.
- Support: Consult Microsoft’s support resources or seek assistance from IT professionals if needed.